If you're looking to migrate your website to Hostinger, you're in luck. Hostinger offers a free website migration service to help you transfer your website from your current hosting provider to Hostinger. In this article, we'll cover everything you need to know about Hostinger website migration, including the benefits of using Hostinger, the steps to migrate your website, and tips for a successful migration.
Why Choose Hostinger?
Why Migrate Your Website to Hostinger?
There are several reasons why you might want to migrate your website to Hostinger. These include:
- Affordable Hosting Plans
Hostinger offers some of the most affordable hosting plans in the industry. Its shared hosting plans start at just $0.99 per month, making it an excellent option for those on a tight budget. Additionally, Hostinger offers a 30-day money-back guarantee, which means you can try out their hosting services risk-free.
- Fast Servers
Hostinger's servers are optimized for speed and performance, which means your website will load faster and provide a better user experience for your visitors. This is particularly important if you run an e-commerce website or a site that relies heavily on traffic.
- Excellent Customer Support
Hostinger has a team of knowledgeable and friendly customer support representatives who are available 24/7 to help you with any issues you may encounter. You can reach them via live chat, email, or phone.
- Security and Reliability
Hostinger uses the latest security measures to protect your website from malware and other online threats. Additionally, their servers have a 99.9% uptime guarantee, which means your website will be up and running almost all the time.
Steps to Migrate Your Website to Hostinger
Now that you know why Hostinger is a great choice for hosting your website, let's go through the steps to migrate your website to Hostinger.

→ Visit now: www.hostinger.com
Step 1: Choose Your Hostinger Plan
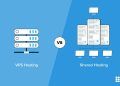
The first step in migrating your website to Hostinger is to choose a hosting plan that suits your needs. Hostinger offers several hosting plans, including shared hosting, VPS hosting, cloud hosting, and WordPress hosting. For most website owners, shared hosting is the best option, as it is affordable and suitable for small to medium-sized websites.
To choose a hosting plan, visit the Hostinger website and select the hosting tab. From there, you can choose the plan that suits your needs and budget. Hostinger's shared hosting plans come with several features, including:
- Free domain name
- Unlimited bandwidth
- Free SSL certificate
- 24/7 support
- Easy-to-use control panel
Step 2: Sign Up for Hostinger
Once you have chosen a hosting plan, the next step is to sign up for hosting. To do this, follow these steps: (www.hostinger.com)
- Click on the “Get Started” button on the Hostinger website.
- Choose your hosting plan.
- Enter your domain name or register a new one.
- Create an account with Hostinger by providing your email address and password.
- Select your payment method and enter your payment details.
- Review your order and click on the “Submit Order” button.
Once your payment has been processed, you will receive an email from Hostinger with instructions on how to log in to your hosting account.
Step 3: Back Up Your Website
If you are using a CMS like WordPress, there are several backup plugins you can use, such as UpdraftPlus, BackupBuddy, and Duplicator. These plugins make it easy to back up your website files and database and store them securely.
Alternatively, you can back up your website manually by downloading all your website files and database to your computer. To do this, log in to your website's control panel, navigate to the file manager, and download all your website files. You can also export your website's database using a tool like phpMyAdmin.
Step 4: Migrate Your Website to Hostinger
Now that you have backed up your website, it is time to migrate your website to Hostinger. There are several ways to do this, depending on your website's complexity and size. Here are some of the most common methods:
Manual Migration
If you have a small website with only a few pages, you can migrate your website manually. To do this, follow these steps:
- Download all your website files and database to your computer.
- Upload your website files to the new Hostinger server using an FTP client.
- Create a new database on Hostinger and import your website's database using phpMyAdmin.
- Update your website's configuration files to point to the new database.
This method requires some technical expertise, but it is a good option if you have a simple website.
Automated Migration
If you have a larger website or lack technical expertise, you can use an automated migration tool to migrate your website to Hostinger. Hostinger offers a free migration tool that can transfer your website files, database, and email accounts to your new hosting account.
To use Hostinger's migration tool, follow these steps:
- Log in to your Hostinger account and navigate to the migration tool.
- Enter your website's details, including the URL, FTP credentials, and database details.
- Select the files you want to transfer and start the migration process.
The migration tool will transfer all your website files, database, and email accounts to your new Hostinger account. This method is quick and easy, and you do not need any technical expertise to use it.
Hire a Professional
If you have a complex website or lack the time or technical expertise to migrate your website, you can hire a professional to do it for you. Hostinger offers a website migration service that can transfer your website to Hostinger for a fee.
To use Hostinger's migration service, follow these steps:
- Contact Hostinger's customer support team and request a migration quote.
- Provide them with your website's details and any special requirements.
- Make the payment and wait for the migration to be completed.
The migration service is a good option if you have a complex website or want to ensure that your website is migrated correctly.
Step 5: Test Your Website
Once your website has been migrated to Hostinger, it is important to test it to ensure that everything is working correctly. This includes checking your website's pages, links, forms, and functionality.
To test your website, follow these steps:
- Check your website's homepage to ensure that it is loading correctly.
- Navigate to your website's pages and ensure that they are loading correctly and all the links are working.
- Test any forms on your website to ensure that they are functioning correctly.
- Check any special functionality on your website, such as e-commerce or membership
Tips for a Successful Website Migration

Migrating your website to Hostinger can be a seamless process if you follow these tips:
- Back Up Your Website: Before migrating your website, back up your website's files and data to ensure you have a copy in case anything goes wrong during the migration process.
- Communicate with Hostinger Support: Communicate with Hostinger's support team throughout the migration process to ensure a smooth transition. Provide any relevant information and respond promptly to any requests or questions.
- Test Your Website: After the migration is complete, test your website thoroughly to ensure everything is working correctly. Check your website's pages, links, and functionality, and resolve any issues or errors.
- Update DNS Records: After the migration, update your website's DNS records to point to your new Hostinger server. This will ensure that your website's visitors are directed to the correct server and can access your website.
→ Visit now: www.hostinger.com
Conclusion
Hostinger website migration service. By following the steps outlined above and using the tips for a successful migration, you can ensure a smooth transition to Hostinger's hosting platform. With Hostinger's affordable pricing, high performance, and advanced security features, you can rest assured that your website is in good hands.
Whether you're looking to migrate a small personal website or a large business website, Hostinger's website migration service can help you make the move. With their knowledgeable support team and advanced technology, Hostinger makes it easy to switch to their hosting platform and enjoy the benefits of their hosting services.


